Lullaby of Singing Wind Woman

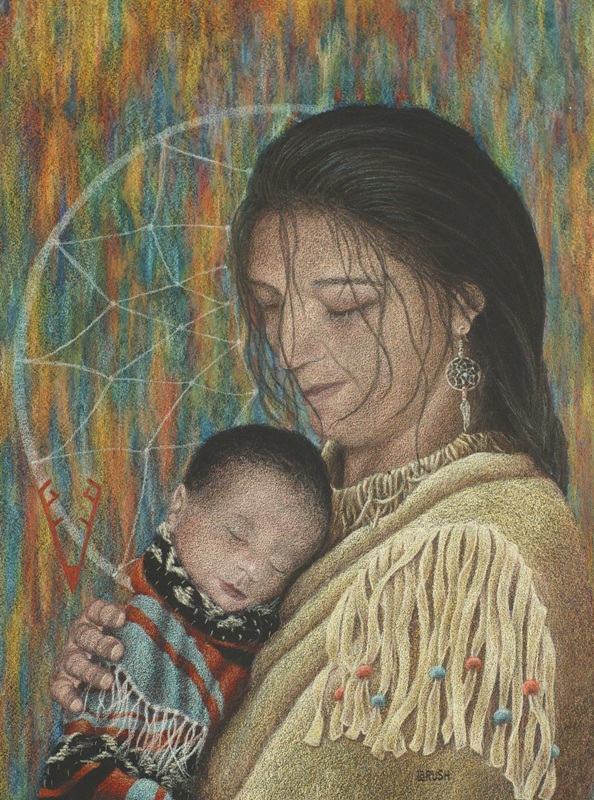
My two older children are Sioux Native American. I think I mentioned that in the blog post about Half-Blood Whole-Heart which used my son as a model. This time I used a photo of my daughter and grandson as the models for LULLABY OF SINGING WIND WOMAN.

Sharayah Burrell Sharayah Cornwell

This drawing was not an attempt at a portrait, I was using the photo as a reference only. After playing with the sketch and changing her hair to a braid, I used tracing paper and a white charcoal pencil to transfer the sketch to my final drawing paper, Canson Mi Tientes Touch black paper.

Lullaby of Singing Wind Woman

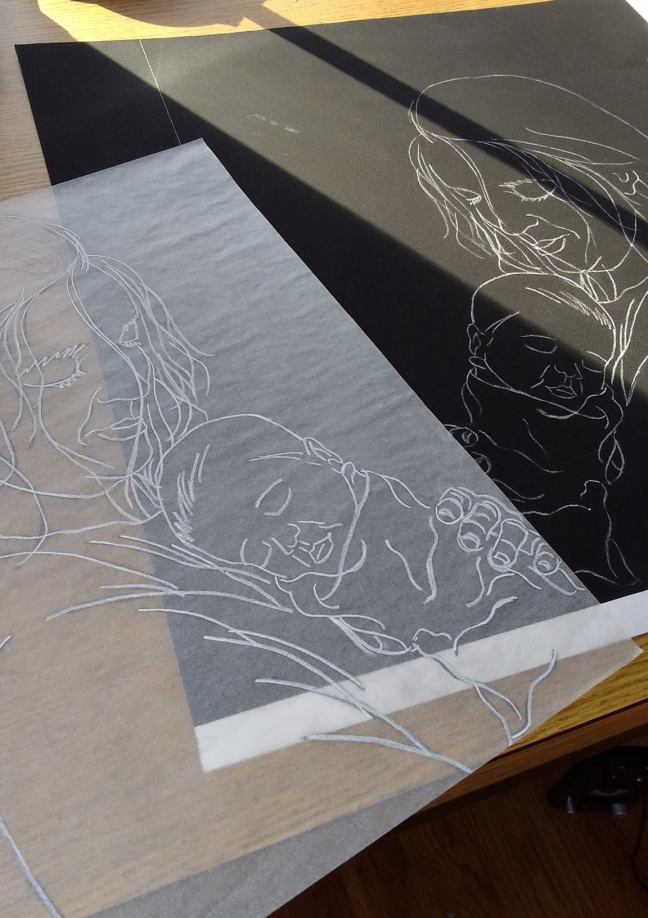
I first trace the drawing with a graphite pencil on tracing paper. Then I turn the paper over and, on the back side, trace the graphite drawing with a white charcoal pencil. Sometimes I use a pastel pencil. I can then position the sketch, with the white side down, on my final drawing paper and trace over the line again to transfer the white sketch to the black paper.

Lullabye of Singing Wind Woman

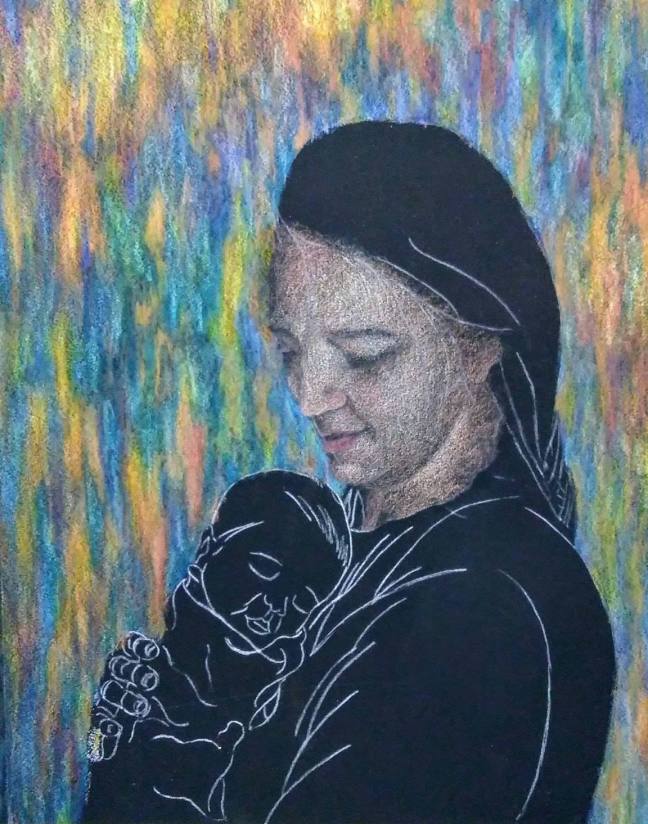
I decided to start with the background first. I was trying an experimental idea and if it didn’t workout I wanted to be free to chuck the whole thing in the bin without losing the time invested in the main composition. I chose turquoise, orange and yellow as the main colors for the background and used Prismacolor Art Stix to lay down most of the color.

Prismacolor Premier Art Stix
Woodless colored pencils

These are fabulous for covering large areas in a short amount of time. They are the same waxed based pigment found in the regular pencils, just without the wood casing and in a different shape.

Unfortunately most of my work-in-progress photos were lost to cyber oblivion, so I only have what was already posted on my Facebook page. I have no clue what happened to all the other photos. No doubt they will turn up after I no longer need them.  Here are the photos I do have.

As I stated earlier, my daughter is Sioux Native American and her native name is Singing Wind Woman. She was not actually singing a lullaby at the time the original photo was taken. In fact, if memory serves me correctly, she had just changed a very nasty diaper. I changed quite a few things about the piece. Her hair was changed from a messy bun to a braid, I added an earring, and changed the t-shirt to a leather fringed tunic. I also changed the baby sleeper to just a blanket. To make these changes I researched pictures online to get a better understanding of braided hair and dreamcatchers. I also looked at numerous photos of leather fringed jackets to be able to better visualize what fringe should look like. I had to imagine the beading on the fringe and just wing it.  For the baby blanket, I used a saddle blanket that we have here at home and wrapped it around a baby doll from the grandkids toy box. I was very pleased with how the blanket turned out.

I couldn’t decide if I should try adding a dreamcatcher to the background when my older son suggested that I make a color copy and pencil it in on the copy to try it out first. Brilliant idea. I did just that and after conferring back with him, my husband and my daughter, we decided the dreamcatcher needed to be there. I couldn’t find a detailed photo that I liked of a dreamcatcher to use as a reference. Then I remembered that I have a dreamcatcher necklace buried in a box. Perfect! I knew I wanted it to be simple and the necklace I have worked great as a reference.

copy
Small color copy with penciled in dreamcatcher background.

Here is the finished work. LULLABY OF SINGING WIND WOMAN, Prismacolor colored pencil on Canson Mi Tientes Touch black paper, 12 x 16, matted and framed to 16 x 20. Photo reference, my own.

Lullaby of Singing Wind Woman

This piece is on display at the Logansport Art Association 108th Annual Spring Art Show in Logansport, Indiana through the month of June 2019.


Finished! The Marbles are Complete

Well, the marbles are finally done. The final piece is being named “Child’s Play.”

I’ve already described the method to my madness, so to speak, so I’ll just post the pictures in order.

Marbles20

Marbles21 Continue reading Finished! The Marbles are Complete

Fantasy Flowers

Mixed media

When I start an art project, I usually begin with the end in mind. I already have an imagined idea of what the finished piece will look like. Fantasy Flowers did not begin that way. I tackled this project completely unplanned. That’s possibly why it’s taken almost a year to finish.

I realized I don’t really like working without a plan. Oh, don’t get me wrong, I want the plan to be flexible and adaptable, but I do want a plan. This piece is also one of the first mixed media pieces that I’ve done, so I was also branching out into unknown territory with this unknown, unplanned project. There was just too much of the unknown with this one. I didn’t even know for sure when it was finished. More or less, I just decided that I was finished with it. I put a lot of pressure on myself to create a “masterpiece” every time I bring out a new sheet of paper. I have to constantly remind myself that it’s okay to decide something isn’t working and just throw it away. I have to tell myself that there is something to be learned in every failure and that it’s not the end of the world. Just throw it away and move on. I know that all sounds like common sense, but for some reason my brain has a hard time allowing me to fail.

Fortunately I am pleased enough with this artwork to keep it and not throw it away. I can’t say that I love it, but I at least like it well enough to share it with the world.

Fantasy Flowers is 18″ x 24″ on Strathmore’s 400 series Mixed Media paper. It consist’s of a watercolor background, oil pastel, colored pencil, and metal leaf.

Mixed media
Mixed Media artwork

Starting a New Portrait

It’s time for another portrait. This one will be a “twin” to the portrait of my grandson, Nolan, that I posted about earlier. This literally will be a twin since it will be a portrait of Nolan’s twin sister, Harper. This will be a mixed media portrait consisting of a pen & ink drawing on a background of acrylic paints.

This morning I worked on the background. I first painted a layer of gesso over the paper and allowed it to dry.

Painted acrylic background for Harper's portrait.
Painted acrylic background for Harper’s portrait.

Next I used a brayer to apply a layer of Cadmium Yellow and Diva Pink acrylic paints. I used a blow dryer to speed up the drying time for these two layers. Once those were dry, I used a damp sea sponge to dabble on some purple  paint, and then a wadded up paper towel to add gold glitter paint and purple glitter paint. Once everything was dry I decided to add some more of the pink so I used a small piece of bubble wrap, the small size, to apply dots of pink. I just love how all of these colors work together. I enjoy looking at just the background. I almost don’t want to add a portrait on top of it.

I’ll keep you posted with work-in-progress photos once I get started. It may be a while before I will be able to work on this one. We’re rolling in to the busy time of year and I’m also preparing other finished artworks for two upcoming shows. I’ll get back to it as soon as I can.

Most Recent Artwork

Nolan portrait

This is a portrait of my grandson, Nolan. Isn’t he just adorable? By the way, the reference photo that I used for this portrait was taken by my daughter who is a professional photographer. https://facebook.com/scornwellphotography .

To create this portrait, I first used gesso on the paper to seal the paper and provide a more stable substrate upon which to paint and draw. I then used a variety of acrylic paints with brush, sponge, and paper towel to create the painted background. The portrait itself was created using a technical pen with black waterproof ink. I used a rubber stamp with black ink to create the “Jesus Loves You” markings on the artwork.